Materials & Tools
-
Yarn
- Premier Parfait Chunky MC
- Premier Parfait Chunky CC1
- Premier Parfait Chunky CC2
-
Safety Eyes
- 10 mm Safety Eyes (optional)
- Polyfill (or stuffing of choice)
-
Hook
- 4.5mm crochet hook (US G)
-
Tools
- Scissors
- Tapestry Needle
- Stitch Markers (optional)
Pattern Notes
- This pattern is written in U.S terms.
- This is an intermediate pattern. Instructions on basic stitches are not included.
- The body is completely no sew, with the frill and the horns being crocheted directly onto the body.
-
Do not use the invisible decrease technique on round 7 decreases.
- Feel free to use invisible decreases anywhere else!
- I suggest using the Yarn Under/Yarn Over technique to keep your stitches tight.
- You will be crocheting in a continuous round - meaning, do not slip stitch your finished round before starting the next one.
- While reading the pattern, color changes will be both noted in a text-based way as well as color coded for ease of reading. See Materials & Tools above for the color key.
Video Help
Some parts of this pattern may prove difficult to explain via text, so here's a video to help with the more difficult parts of the pattern! Parts shown in the video will be marked.
Abbreviations
- Ch: Chain
- SC: Single Crochet
- Tr: Treble Crochet
- TrBob: Treble Bobble
- 3Bob: 3 Bobble
- SlSt: Slip Stitch
- BLO: Back Loop Only
- FLO: Front Loop Only
- St(s): Stitch(es)
- MR: Magic Ring
- DEC: Decrease SC
- INC: Increase SC
- MC: Main Color
- CC1: Contrasting Color 1
- CC2: Contrasting Color 2
Special Techniques
There are several special techniques used in this pattern, such as the Treble Bobble. Other "special stitches" are general ones you should be able to find easily through youtube or by following the video portion of this pattern!
Treble Bobble (TrBob) (Video)
This stitch is used for each of the feet on the triceratops.
Step 1: YO 2 times, insert hook into the St. Place your yarn under the hook and pull up a loop. (4 loops on the hook)
Step 2: Yarn over, and pull through 2 loops. (3 loops on the hook)
Step 3: Yarn over, pull through 2 loops. 1 TR completed. (2 loops on the hook)
Steps 4-12: Repeat steps 1-3 3 more times. There should be 5 loops on the hook
Step 13: YO and pull through all 5 loops on the hook.
Step 14: Gently flip the bobble so that the bobble is facing outwards rather than in.
Pattern
Because this pattern contains a few different parts, the pattern will be separated into each part, respectively! Use the Table of Contents at the top of the page to jump around to the sections you need!
Pattern - Body
We will be starting with the snout. Start with MC,
R1: 8SC into MR (8 Sts)
R2: 2SC, 4INC, 2SC (12 Sts)
R3: 2SC, INC, 2SC, 2INC, 2SC, INC, 2SC (16 Sts)
R4: 6SC, 4INC, 6SC (20 Sts)
R5-6: SC around (2 rounds) (20 Sts)
Reminder: Do not use invisible decreases for round 7. You will have 10 Front Loop sts left. Use stitch markers to mark the first and last front loop for later!
R7: 6SC, (All in BLO - SC, 4Dec, SC), 4SC (16 Sts, 10 Front Loops should be visible)
R8: *2SC, Dec. Repeat from * until end of the round (12 Sts)
Insert safety eyes between rounds 4 and 5, about 8 stitches apart. Use the 4INC of round 4 as a guide. (Video)

Firmly stuff the head.
R9: 5SC, 4INC, 3SC (16 Sts)
R10: 5SC, INC, 2SC, 2INC, 2SC, INC, 2SC, TrBob (20 Sts)
Note: Be very careful working in stitches after the TrBob, it can be easy to miss stitches after this stitch.
Note 2: Lobsided feet? You may have to adjust the TrBobs depending on your tension!
R11: 2SC, TrBob, 2SC, INC, 4SC, 2INC, 4SC, INC, 3SC (24 Sts)
Note: After a TrBob is completed, make sure the bobble is puffed outwards, not inside the body.

R12-16: SC around (5 rounds) (24 Sts)
R17: TrBob, 2SC, TrBob, 3SC, Dec, 4SC, 2Dec, 4SC, Dec, SC (20 Sts)
R18: SC around (20 Sts)

Stuff the body
R19: 8SC, Dec, 2SC, 2Dec, 2SC, Dec (16 Sts)
R20: 8SC, 4Dec (12 Sts)
R21: SC around (12 Sts)
Finish stuffing the body, stuff the tail as you go.
R22: (4SC, Dec) x2 (10 Sts)
R23: SC around (10 Sts)
R24: (3SC, Dec) x2 (8 Sts)
R25: SC around (8 Sts)
R26: (2SC, Dec) x2 (6 Sts)
R27: SC around (6 Sts)
R28: (SC, Dec) x2 (4 Sts)

Fasten off & weave in ends
Pattern - Frill (Video)
Hold your dinosaur with its head facing away from you and feet facing down.

Using MC, SlSt into the first front loop of R7. Ch 1.
Note: You should have 10 front loop stitches left on round 7! This is why we didn’t use the invisible decrease in this round.
R1: Using MC, (3SC into the Same St, SC in the next 2 Sts) x3, 3 SC into the last St. (18 Sts)

Change to CC1 in the last St. Ch 1 and turn.

R2: SC, 3Bob, (4SC, 3Bob)x2, 4SC, 3Bob, SC (18 Sts)
FO and cut yarn, weave in ends.

Pattern - Nose Horn (Video)
With your dinosaur facing you, insert your hook into the top-most St of R1.

With CC2, SlSt and Ch 1. All in the same St, HDC, SlSt.
FO and weave in ends. You may need to adjust the horn a bit to fluff it up.

Pattern - Head Horns (Video)
(Optional) Use 2 stitch markers to mark 2 spots on your triceratops’ head in the spaces between rounds 5 and 6 for the head horns.

There should be 1-2 stitches visible between each horn.
A general rule of thumb - your horns should be directly above the eyes of your triceratops.
Right Horn
Turn your dinosaur so that it’s facing to your left.

With CC2, Insert your hook into the st directly above your dinosaurs’ eye (or the marked stitch). SlSt, Ch 2, SlSt into the same St. FO the right horn.
Left Horn
Turn your dinosaur so that it’s facing to your right.

With CC2, Insert your hook into the st directly above your dinosaurs’ eye (or the marked stitch). SlSt, Ch 2, SlSt into the same St. FO and weave in ends for both horns.

You're All Done!
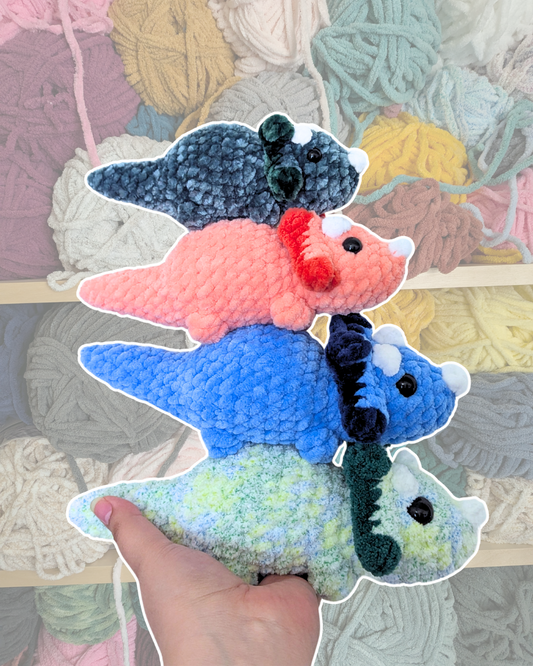
And there you have it - your snoot is officially done! I hope you enjoyed this pattern, be sure to tag me on Instagram with your finished Snoot, I'd love to see how they turned out! ♥