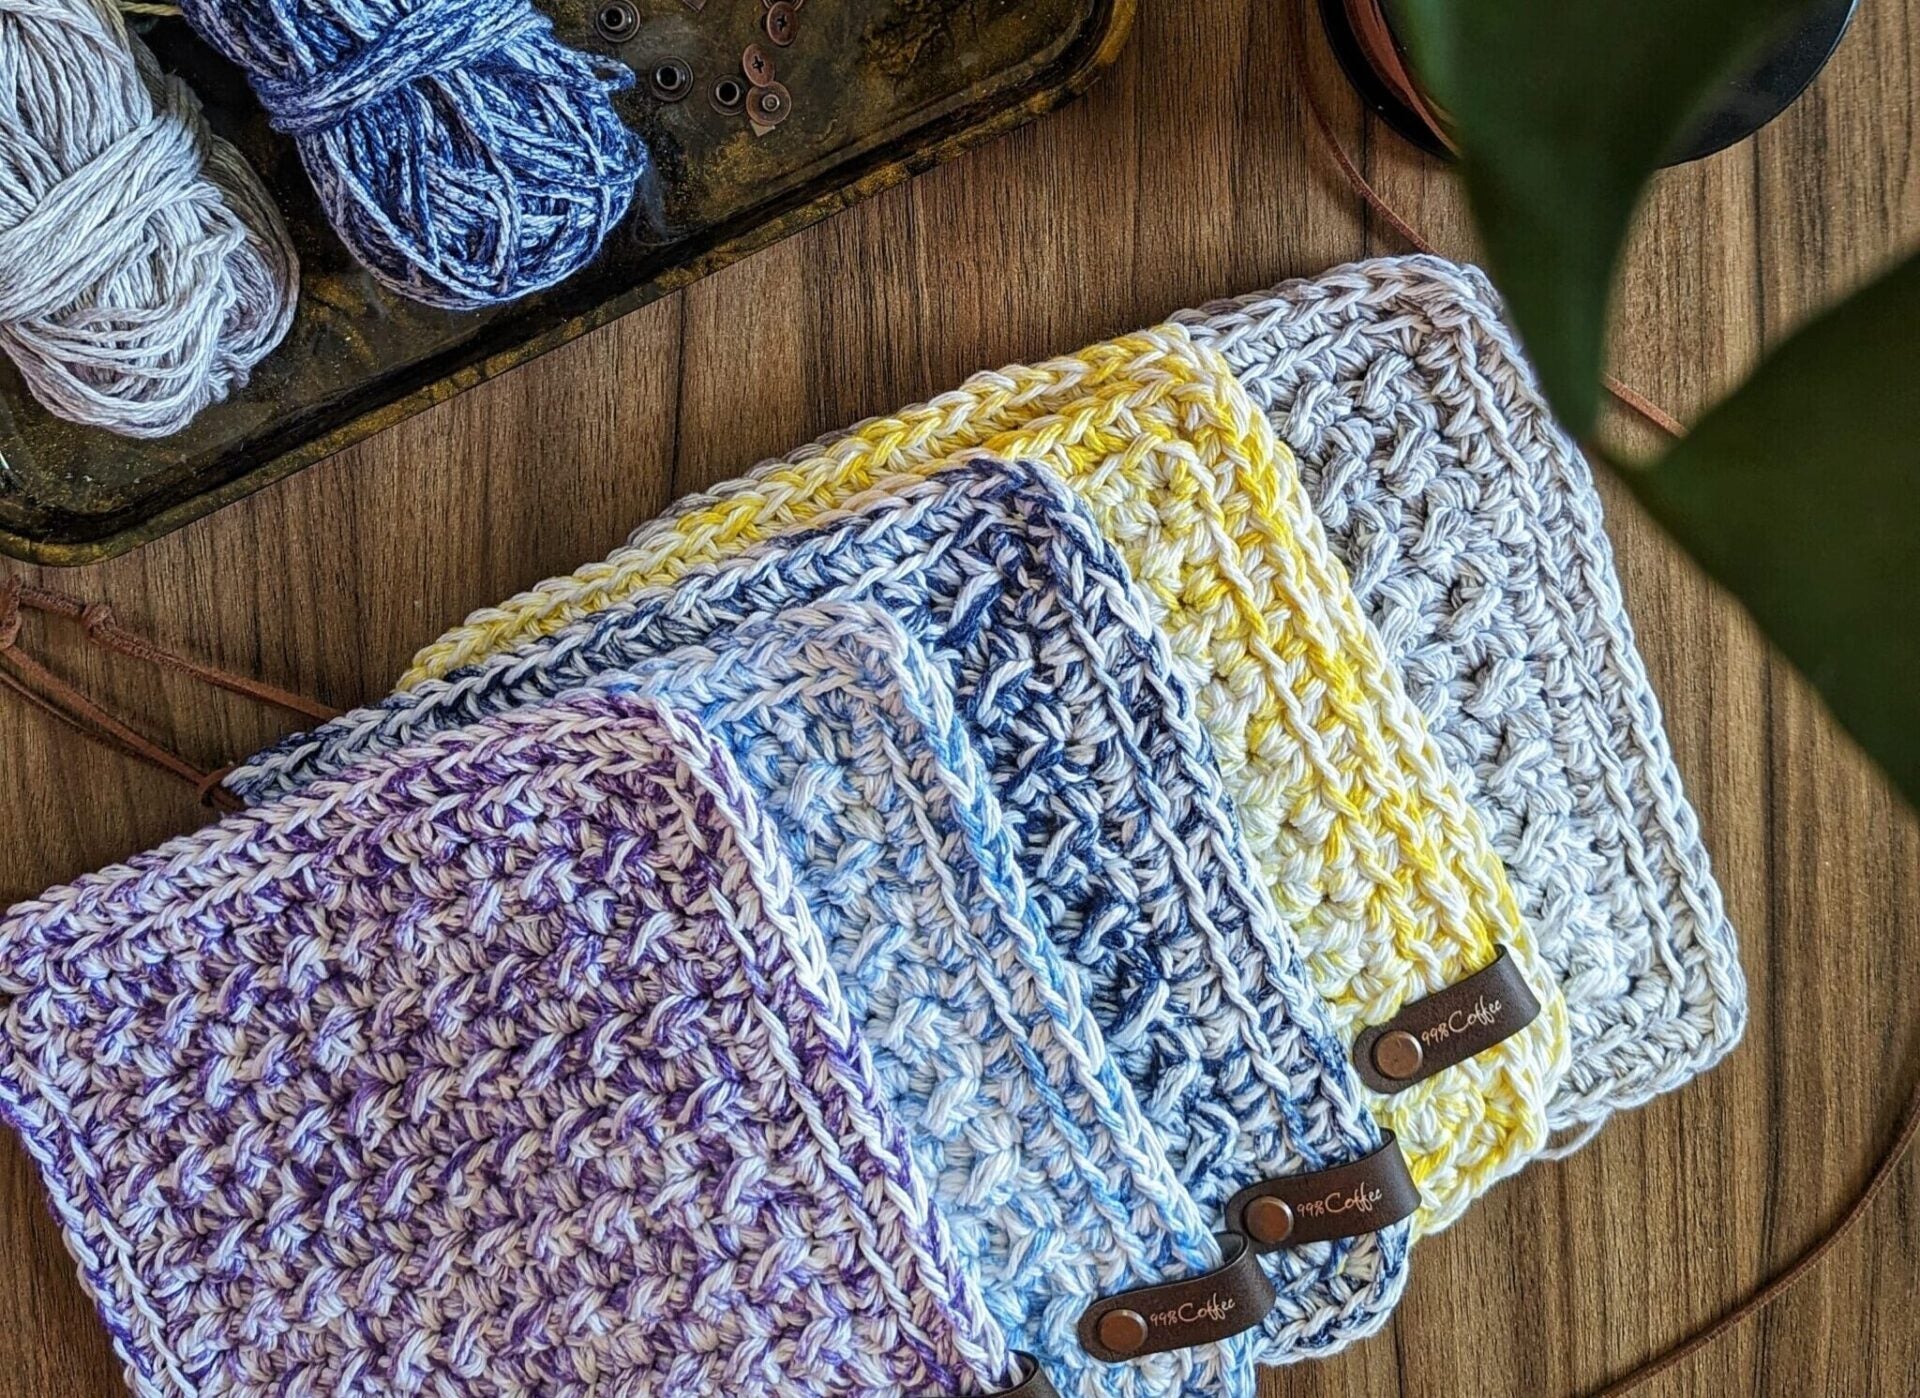
Potholders are a kitchen necessity. They protect your countertops from hot pots and pans and help against burns while cooking. They are also a decorative piece that you often wouldn't think of! You can really tell a lot about a person by their decor - that's where the Modern Moss Stitch Potholder comes into play!
New to crocheting? Not a problem! This pattern is perfect for beginners! If you need help picking up a specific stitch in this pattern, check out my article on the 5 basic stitches that you need to learn to start crocheting! As always, abbreviation notes can be found in the pattern notes section of this pattern.

This potholder comes out to about 7.5" x 7" and can easily be adjusted by adding or removing a few stitches. It features the even moss stitch, an easy pattern for even beginner crocheters to pick up on. I've finished it off with a simple double Single Crochet border as well with a border detail on the final row.
Materials
- Worsted Weight Cotton Yarn in solid color (C1)
- I used Premier Yarns' Premier Home Cotton in white.
- You will need about 55 yards of C1
- Worsted weight cotton yarn in variegated color (C2)
- I used Premier Yarns' Premier Home Cotton in any of the splash colors.
- You will need about 55 yards of C2
- 12" of Thin Faux Leather Cording
- US I/9 - 5.5 mm Hook
- Tapestry Needle
- Scissors
- Locking Stitch Marker (optional)
Pattern Notes
- This pattern is written in US terms.
- All stitches are worked using both loops of each stitch, unless otherwise stated.
- This project follows a 2+1 pattern repeat on the foundation row.
- Any worsted weight yarn will work with this pattern. I would suggest using a cotton yarn, as cotton is generally fairly heat resistant and wont melt like synthetic fibers.
- To achieve the marbled look as in the example potholders, use 2 strands of yarn held together throughout the project - one solid white, and one variegated color. I used Premier Yarns' Premier Home Cotton line in white and different splash colors.
- If you prefer to make this a solid color, continue to use 2 strands of yarn held together to keep the double thick pattern consistent.
- While the base of the project is done flat, the border of the pot holder is done in continuous rounds. Use stitch markers if needed to help keep track of the beginning of the round.
- There is no loop built into this pattern - and a faux leather strap is instead added after the project is completed. If you prefer to add your own strap, feel free to do so using your own preferred method!
- The finished dimensions of this project come out to about 7" x 7.5"
Abbreviations
- Ch - Chain
- St(s) - Stitch(es)
- Sl St - Slip Stitch
- SC - Single Crochet
- HDC - Half Double Crochet
- TBL - Through Back Loop
- Sk - Skip
Creating the Strap
- Cut your faux leather cord to about 12" in length for each strap you need to make.
- Fold the cord in half and wrap the 2 ends around your finger, crossing the 2 ends over the end with the loop.
- Pinch the point where the ends cross and slide your finger out.
- Fold the end with 2 tails through the hole where your finger was, creating a knot. Tighten, leaving between 1 and 2 cm of tail below the knot.
- In your chosen corner, find the exact corner stitch between the 1st and 2nd round of the border. Insert the knotted end of your strap into the stitch that all round 2 corner stitches were done in from the back to the front.
- Insert the knot of your strap through the loop on the other side of your potholder. Pull the tail to tighten the strap.
Pattern
With yarn held double, Chain 21
Row 1: In 2nd Ch from hook, *HDC. In next St, Sl St. Repeat from * until end of row. Ch 1 and turn your work.
Row 2: In first St, *HDC. In next St, Sl St. Repeat from * until end of the row. Ch 1 and turn your work.
Get the Ad-Free PDF of this Pattern
Support my work by purchasing the ad-free PDF version of this pattern! With your purchase, you'll receive:
$3.50
- The Ad-Free PDF version of the Modern Moss Stitch Potholder Crochet Pattern
- Instant Digital Download on your chosen platform
- The Pattern written in U.S. Terms Only
- Pattern Support with Savannah via e-mail for any questions
Just want the free version? No problem, just keep scrolling!
Rows 3-17: Repeat row 2 until 17 total rows have been worked. At row 17, Ch 1 and turn, but do not cut your yarn.
Begin Border
Note: The border is done in the round, so you will not be turning at the end of each round.
Border Round 1: In same St, 3 SC. * 1 SC into each St until the next corner stitch of the potholder, 3 SC. Repeat from * until you reach the first St of the round. Do not Ch, instead move directly to the next round.
There should be 18 stitches across the top and the bottom (longer sides) of the potholder (not counting any of the 3 corner stitches) and 15 stitches along the left and right sides (shorter sides) of the potholder, not counting any of the 3 corner stitches.
Border Round 2: SC TBL of next St, 3 SC TBL into the corner stitch of the potholder. * Continue with SC TBL across the edge of the potholder until you reach the next corner, 3 SC TBL. Repeat from * until all stitches have been worked. Sl St into the top of the first St of the round to end round 2.
Cut yarn and weave in ends.
Attach your faux leather strap.
Attach any tags or extras you'd like, and your potholder is ready for use!
Finishing your Potholder
And there you have it - a quick, simple potholder with so much use!
I love using these potholders for anything - from protecting my counter tops to shuffling around pots and pans (one day I'll have a fancier stove/oven...) and love to give them as gifts for really anything. I recently gave a set of these to a cousin for their wedding, and I absolutely love how they turned out with a marbled yarn as well!
Care-wise, because they are crochet with 100% cotton, they wash and dry very well in the normal washing machine/dryer cycle with my kitchen towels. Because they are made to handle heat, I would caution against using acrylic or another plastic-based/easily meltable yarn for these, as the yarn can melt under high temperature.
Share:
Making Waves Dishcloth - Free Pattern for the Beach Lover in You
Loops & Threads Impeccable - A Review of Michael's Acrylic Yarn